
I’ll be honest: I bought the Gleedelish 2LB Bread Maker during a late-night “I should stop eating store-bought bread” spiral. I wanted fewer mystery ingredients and more control over what my family eats… but I also didn’t want to knead anything. At all. I saw this machine floating around Amazon with its “13 or 25 program versions,” mixed reviews, and a surprisingly long list of features for the price. So I figured—why not?
After weeks of using it almost nonstop (I’m talking daily loaves, pizza nights, yogurt batches, and one jam experiment gone too well), here’s my honest Gleedelish Bread Maker Machine Review.
Overview table for the Gleedelish 2LB Bread Maker
| Feature | Details |
|---|---|
| Model | Gleedelish 2LB Bread Maker Machine |
| Loaf Size | 1–2 lb (500–1000g) |
| Programs | 13 or 25 presets (white, whole wheat, French, sweet, gluten-free, dough, yogurt, jam, cake, etc.) |
| Crust Options | Light, medium, dark |
| Delay Timer | Up to 13 hours |
| Keep Warm | Yes, but can soften crust if left too long |
| Kneading & Mix | Single kneading paddle; automatic fruit/nut dispenser |
| Accessories | Measuring cup, measuring spoon, kneading hook, small oven mitt, recipe booklet, manual |
| Ease of Use | Beginner-friendly, forgiving, quiet operation |
| Cleaning | Non-stick pan, easy to clean (avoid abrasive scrubbers) |
| QC Notes | Some units may arrive with chipped pan, dinged paddle, hazy display, or scuffed buttons—inspect immediately |
| Best For | Beginners, busy families, pizza/dough users, yogurt/jam makers |
| Not Ideal For | Advanced sourdough bakers, artisan crust perfectionists, those expecting flawless packaging/manuals |
| Price | CHECK PRICE ON AMAZON |
First Impressions – Gleedelish Bread Maker Machine Review
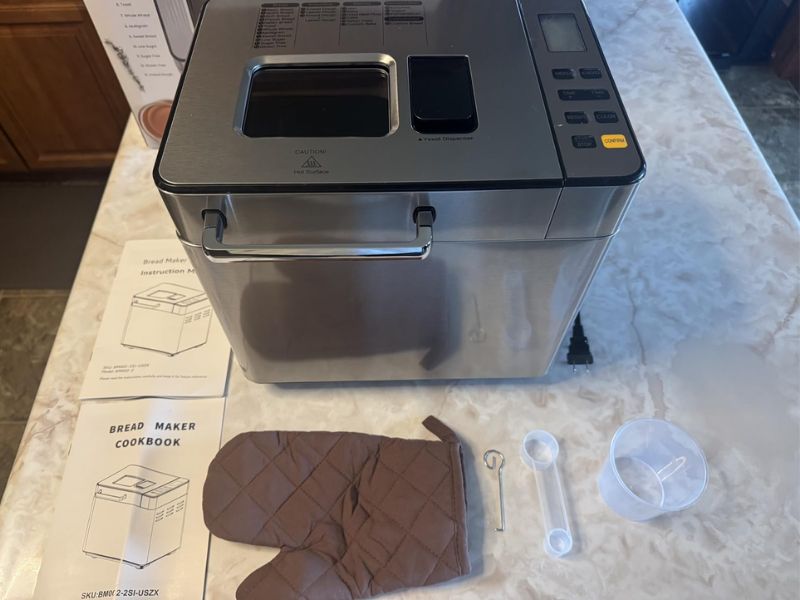
The machine arrived extremely well packaged—not a scratch, dent, or loose part anywhere. Some people online said theirs arrived chipped or used-looking, so I inspected everything right away. Mine was perfect, but if you’re buying one, take 30 seconds to check the bread pan corners and the paddle area for paint chips around the pins. A few unlucky buyers ran into that.
The machine itself feels solid but not heavy, with a tall profile that fits on my counter but might be tight under low cabinets.
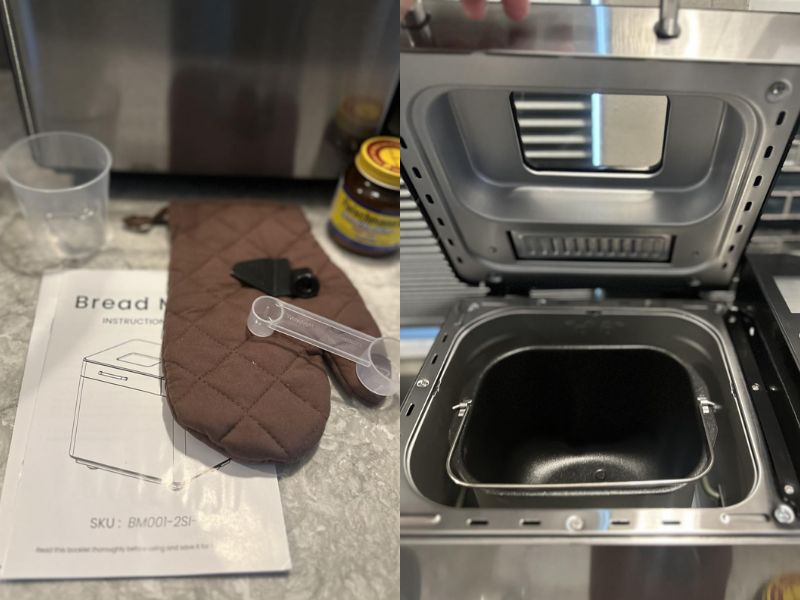
Inside the box, it came with:
-
a measuring cup
-
a measuring spoon
-
a metal hook for retrieving the kneading paddle
-
a tiny oven mitt (cute, but let’s be real… useless)
-
a recipe booklet
-
the main instruction manual
The manual reads like it was translated three times and then shaken around a bit, but the pictures help. The only confusing part was that some program numbers don’t match the recipe book, which is apparently a known quirk on many units. Once you run a cycle, though, the sequence starts to make sense.
Before baking, I ran the recommended empty “burn off” cycle. Some reviewers mentioned a slight manufacturing smell during this, and yep—it’s there, but it goes away.
Ease of Use
Even though the control panel looks complicated at first glance, it becomes intuitive fast. You mostly adjust:
-
loaf size
-
crust color
-
program number
There are two versions of this machine on the market:
-
13-program model
-
25-program model
I bought the 25-program version because the price difference was tiny, and honestly, I’m glad I did. Some of the “extra” programs—like yogurt, jam, and dough tweak options—ended up being way more useful than I expected.
The machine kneads quietly (just a low hum), doesn’t wobble, and transitions between kneading → rising → punching down → baking without any weird pauses.
A couple of quirks worth mentioning:
-
If you select the wrong program, the machine won’t let you instantly cancel. You need to unplug it and wait about 30 minutes for a full internal reset.
-
The LCD display is small. Some units reportedly came with a foggy or low-contrast display, but mine looked fine.
-
Some programs don’t behave exactly like the manual describes. For example:
-
The “knead + leaven” setting on some units kneads only.
-
The custom program (#25) has no timing chart anywhere—pure trial and error.
-
Still, once you get the hang of the basics, using it becomes second nature.
And the delay timer? Amazing. Nothing beats waking up to fresh bread. I swear it’s like cheating.
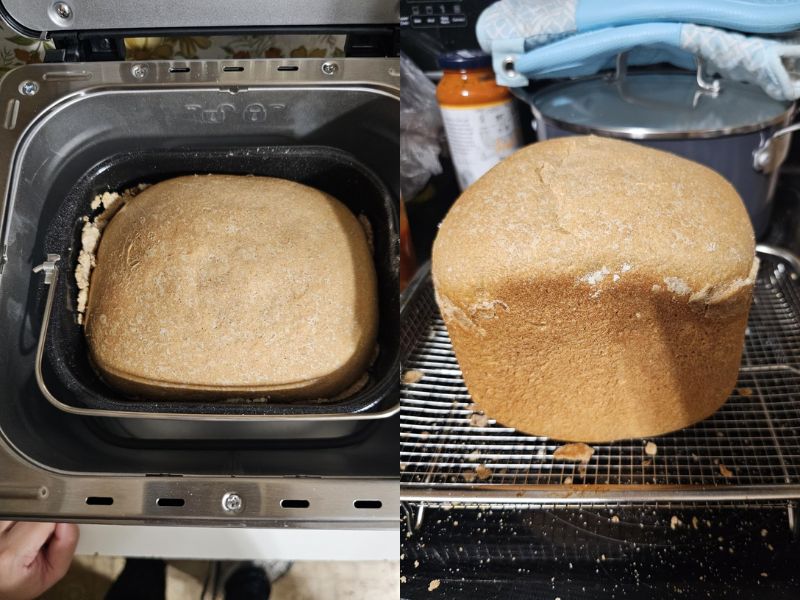
The Bread Results – Gleedelish Bread Maker Machine Review
This was the biggest surprise. I expected “okay for the price.” Instead, I got:
-
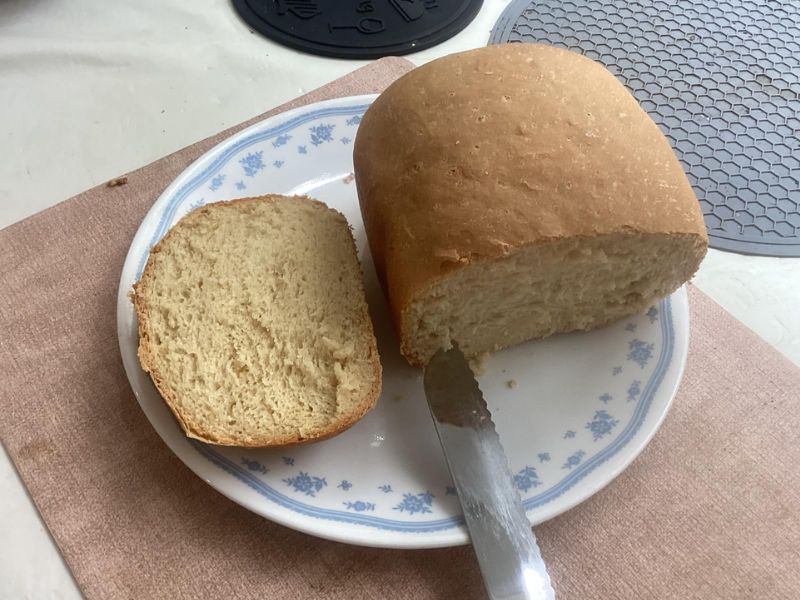
evenly baked loaves
-
zero dense bottoms
-
consistent rise
-
crisp (but not rock-hard) crust
-
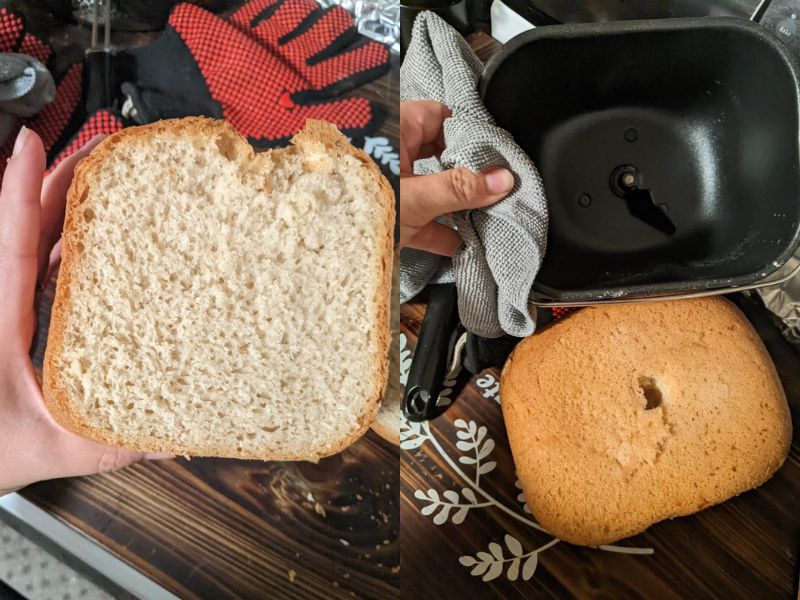
soft and fluffy interior
-
slices that don’t collapse
My very first white loaf was ridiculously good. The aroma alone had my entire family in the kitchen.
Here’s everything I’ve made so far:
-
white bread
-
whole wheat
-
French
-
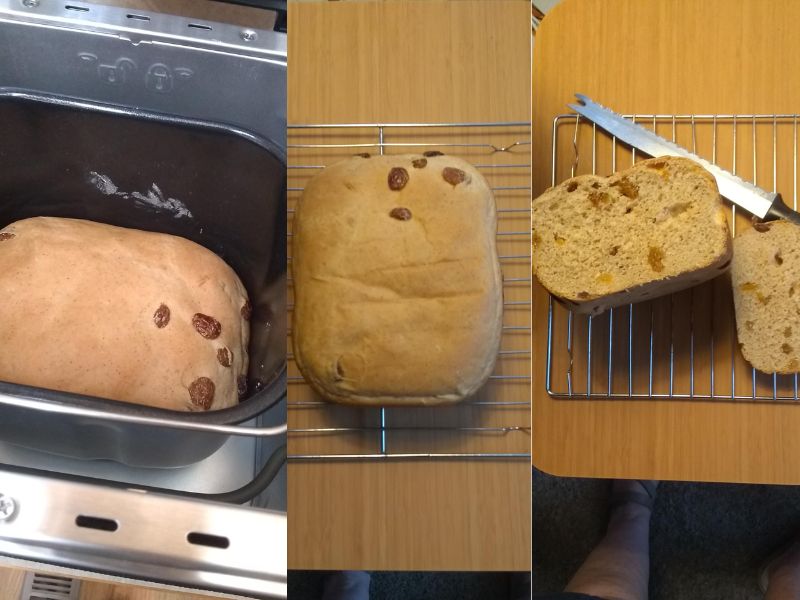
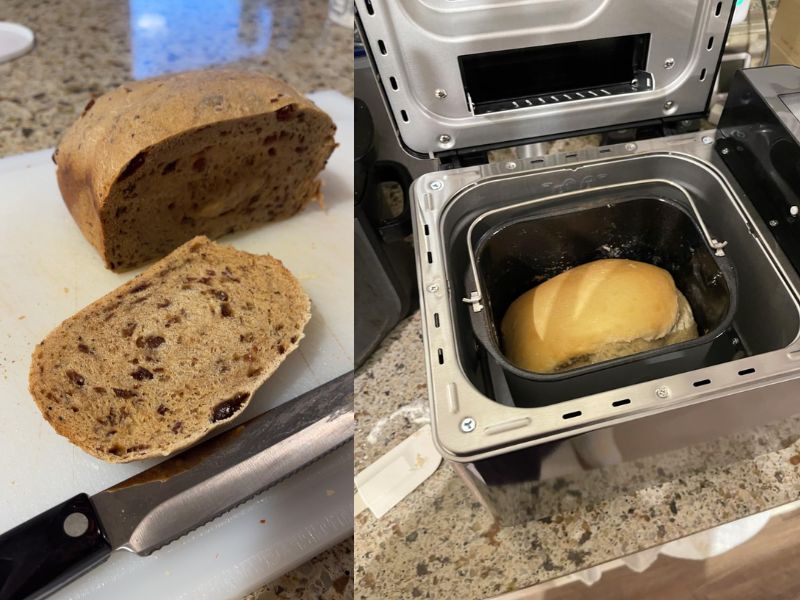
cinnamon-raisin
-
sweet bread
-
banana bread
-
gluten-free bread (needed a small water adjustment, which is normal)
-
soft dinner rolls (using dough mode)
-
pizza dough
-
jam
-
yogurt
A few technical notes pulled from user feedback + my own testing:
-
Even complicated doughs (like French bread or raisin bread) come out well mixed.
-
The fruit/nut dispenser actually works, opening right on cue.
-
Dough mode produces incredibly smooth dough—no hand kneading needed.
-
A few reviewers mentioned their yeast dispenser misfired (yeast landing outside the pan). Mine worked perfectly, but it’s something to check.
-
If your bread comes out underdone, running a slightly bigger loaf setting (ex: using the 1000g setting for a 750g recipe) fixes that.
Overall, the consistency is impressive for this price point.
What I Love Most?
Key Features I Actually Use
-
1–2 lb loaf sizes
-
Light/medium/dark crust options
-
Non-stick ceramic-coated bread pan
-
Automatic fruit/nut dispenser
-
25 programs (or 13 depending on your model)
-
Dough, cake, jam, yogurt, gluten-free modes
-
13-hour delay timer
-
Keep-warm mode
-
Quiet kneading
-
Surprisingly forgiving recipes—small mistakes don’t ruin everything
Something I noticed: unlike some higher-end machines, this one isn’t overly sensitive to ingredient measurements. If you’re off by a spoonful, it still behaves.
Pros (Real Life)
-
Very consistent results
-
Beginner-friendly, even if you’ve never baked before
-
Dough mode is fantastic for pizza, rolls, and buns
-
Much quieter than many other machines
-
Bread pan cleans in seconds
-
Fruit/nut dispenser works reliably
-
Recipes bake evenly with no collapsed tops
-
Takes up less counter space than expected (though it is tall)
-
Can handle sweet dough, sticky dough, gluten-free dough—everything I threw at it
Surprisingly Useful Programs – Gleedelish Bread Maker Machine Review
I really didn’t think I’d use these, but I keep coming back to them:
Yogurt
Holds steady temperature. I run it 10–12 hours for thick yogurt.
Jam
Perfect for tiny batches—strawberry and mixed berry turned out glossy and delicious.
Dough-Only
Game changer for pizza nights, dinner rolls, and cinnamon rolls. I basically don’t knead by hand anymore.
What I Don’t Love
Here’s the honest list—no sugarcoating:
-
The recipe booklet is basic and sometimes poorly converted from metric.
-
The included oven mitt is more comedy than functionality.
-
Loaf shape is always rectangular, standard bread-machine style.
-
Leaving bread on keep-warm too long softens the crust.
-
The paddle sometimes sticks inside the loaf (soak the pan → it pops right out).
-
The machine requires a long 30-minute reset if you mess up a program.
-
Some units from other buyers had QC problems:
-
chipped pan coating
-
dented paddles
-
yeast dispenser missing the pan
-
slightly hazy display
Mine arrived perfect, but I still checked everything before first use.
-
Also, if you’re extremely picky about dough hydration, you’ll need a few trial bakes to dial it in.
Tips I’ve Learned (So You Don’t Make My Mistakes)
These will save your sanity:
-
Use a kitchen scale—grams are much more accurate.
-
Layer ingredients in this order: liquids → dry → yeast.
-
Check the dough during the first 10 minutes. If it’s too dry or too wet, adjust with teaspoons of water/flour.
-
Remove the loaf immediately after baking.
-
Let it cool fully before slicing.
-
Lightly oil the paddle before starting.
-
Never use abrasive scrubbers on the pan.
-
If you’re at high altitude, reduce yeast slightly.
-
If your yeast dispenser is unpredictable, add yeast manually in a flour well.
-
For artisan crusts: use dough mode → bake in a Dutch oven.
A concise action checklist for buyers (do this right away)
-
Inspect unit and pan for chips/damage; photograph packaging.
-
Run an empty “burn” cycle as instructed, ventilate kitchen.
-
Grease the paddle and check it fits correctly.
-
Try a simple white loaf using your own trusted recipe (or a 1st-cycle booklet recipe) to get baseline.
-
Test the yeast dispenser on a practice run (or add yeast manually if concerned).
-
Keep a kitchen scale handy; measure in grams.
-
If you misselect modes and need a reset, unplug for ~30 minutes.
-
For artisan bread, use dough-only then bake in the oven.
-
If the pan is damaged, contact seller with photos immediately.
Final Thoughts
I went into this expecting “decent for the price.” I ended up with a machine that became part of my weekly routine… and sometimes part of my daily routine. The Gleedelish 2LB Bread Maker isn’t a boutique sourdough machine, and it has its quirks, but it delivers:
-
reliable performance
-
fluffy and flavorful bread
-
consistent rise
-
quiet operation
-
surprisingly good dough
-
way more versatility than expected
And most importantly, it makes good bread with barely any effort.
Would I recommend it?
Absolutely.
Especially if you want fresh bread without babysitting dough all day.
Just check your pan for chips when it arrives, keep a kitchen scale nearby, and give yourself one or two loaves to learn the machine. After that? It’s smooth sailing.
The Gleedelish has fully earned its spot on my counter—and I didn’t expect to say that when I bought it on a whim.
Leave a Reply